If you try to read text in Microsoft Word and it won't work, or if any of Read&Write's tools don't function in Word when they work fine in other apps, this can happen after updates to Office are installed.
In this case files used by Read&Write and Microsoft Word can become damaged and need to be repaired.
To do this, please follow the steps below:
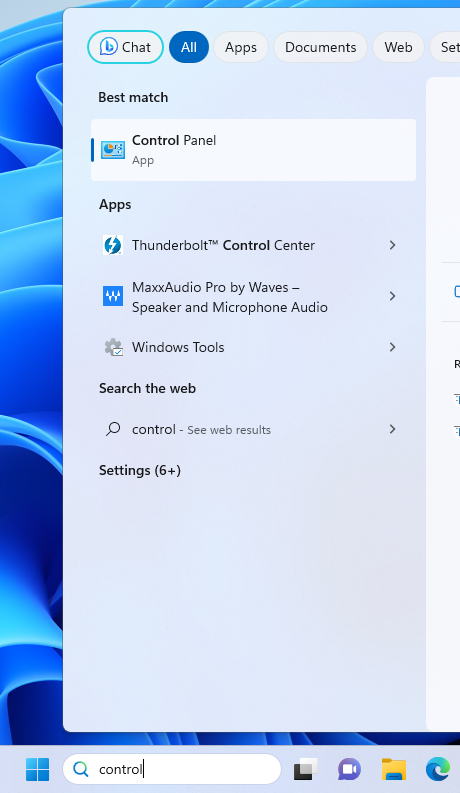
1) Open your Control Panel; the quickest method to do this is to search for 'control panel' in your Windows Search Bar.
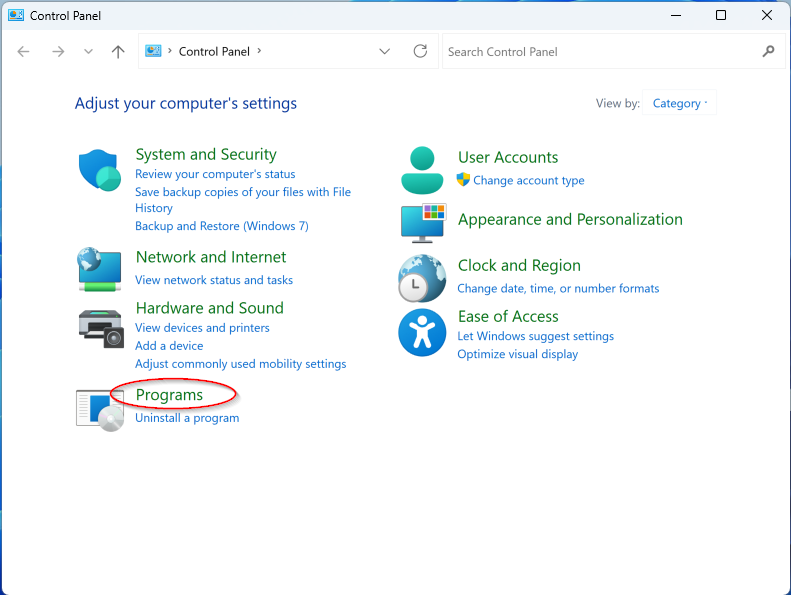
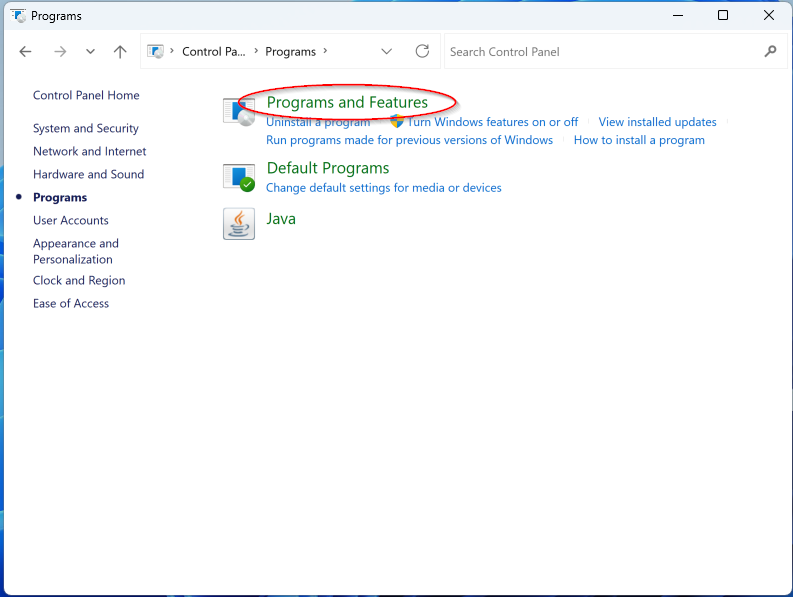
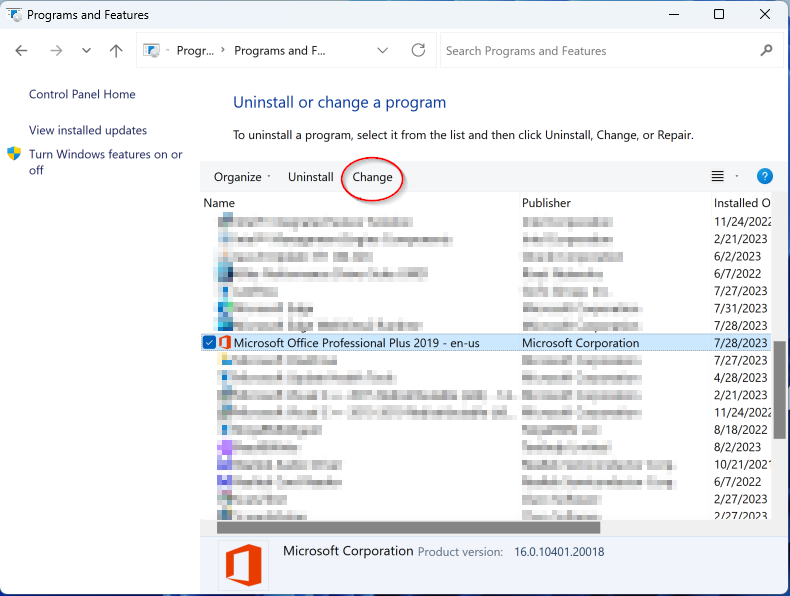
2) In Control Panel, click on 'Programs > Programs and Features'.
3) In the list of programs that appears, find your installation of Microsoft Office and click it to select it.
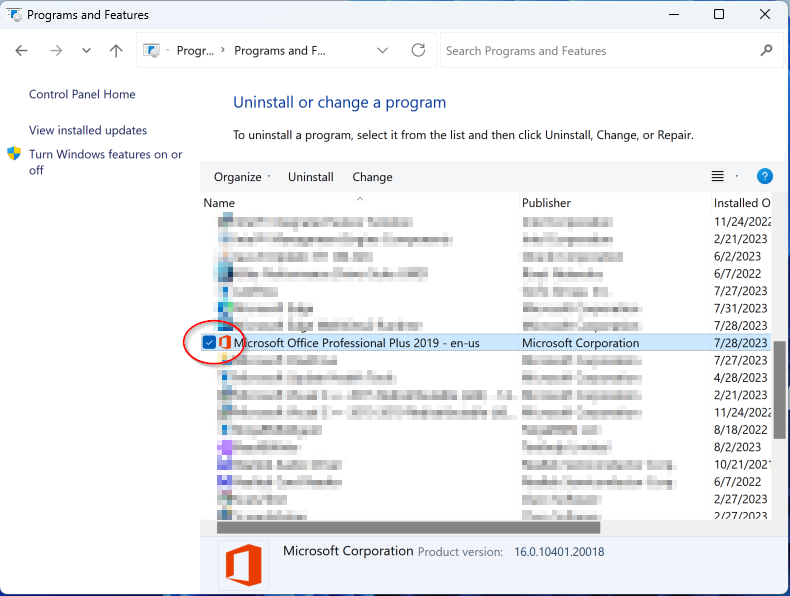
4) Choose the 'Change' option from the menu at the top of the list.
5) The Office Repair window should now open. Select 'Quick Repair' from the options and then follow the on-screen steps to complete the repair.
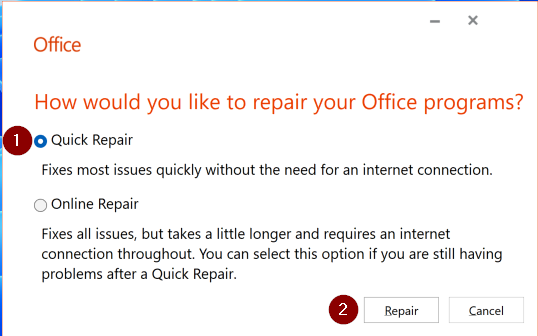
6) If this does not resolve the issue, repeat Step 5 but this time perform an ‘Online Repair’.
Once the repair(s) is complete, try again to use the features of Read&Write you were having trouble with in Microsoft Word.
If you still have issues after trying both a Quick and Online Repair, then the next best step is to reinstall Microsoft Office. If you are a technical person (or have access to one), there are also some other fixes you can try:
Delete the normal.dot or normal.dotm document template.
Close Word.
Open Windows Explorer.
Turn on “Show hidden files, folder and drives”.
Go to:
“C:\Users\[your username]\AppData\Roaming\Microsoft\Templates”
Delete normal.dotm
Restart Word.
Word may need to re-register with Windows. To do this you will need to open the run command.
To do this: Click Start and type ‘run’ in the search box, this should bring up the Run shortcut, click on it.Depending on your version of office type the following into the run command. If you are using a 64-bit version of Windows, replace “\Program Files\” with “\Program Files (x86)\” "C:\Program Files\Microsoft Office\root\Office16\WINWORD.EXE" /r
Close Read&Write.
Click on Start > All Apps/Programs > TextHelp, and right-click on the Read&Write shortcut.
Select “Run as Administrator”.
If this does not work, try doing the same for Microsoft Word, and finally for both. Read&Write does not need to be run as an administrator but permissions can be confused on a machine so one or both of Read&Write and Word need to be run elevated. If you find this is the case, try the following steps:Navigate to Microsoft Word, usually in Program Files > Microsoft Office > Officexx, and called winword.exe. Right-click on winword.exe and select Properties. Open the Security tab.
Navigate to Read&Write, usually in Program Files > TextHelp > Read And Write 12 > Read&Write, and called ReadAndWrite.exe. Right-click on ReadAndWrite.exe and select Properties. Open the Security tab.
Check that the “Group or User names” list is the same for each program. For each entry in the list check that the Permissions list has the same settings for Allow and Deny.
Change the “Read” and “Read & Execute” entries for Read&Write (or Word) so they are the same.
Check your network administrator, if you have one: has anything in Microsoft Word been disabled, for example in the Group Policy Editor or Group Policy Management Console?
The Windows Registry contains keys that must all correctly reference your installation of Microsoft Word. Repairing Microsoft Word may fix your installation of Word but may leave intact erroneous keys – for example, keys from a different version of Word that are not referenced by your current version. One key we have discovered is HKEY_CLASSES_ROOT > TypeLib > {00020905-0000-0000-C000-000000000046}. Child keys of this key reference a special file in Word, the MSWORD.OLB file. If you have any child keys in here that reference a wrong or missing MSWORD.OLB file, then Read&Write will not speak correctly in Word. You can do two things to fix these MSWORD.OLB references:
Search through the child keys of {00020905-0000-0000-C000-000000000046} for any references to an MSWORD.OLB file that is not part of your current installation, or is not actually where it says it is on the computer. For example, if you find a child key that references C:\Program Files (x86)\Microsoft Office\Root\Office16\MSWORD.OLB (the Word 2016 file) but you have Word 2013 installed, then you should delete the child key.
You may also need to add back in the correct reference to the current MSWORD.OLB. You are probably best to use the Office repair operations detailed above. Alternatively, visit the Microsoft Support website to get additional information/support how to fix this issue.
Run Word in Safe Mode so Add-ins and Extensions are disabled. If it then works this may be indicative of a conflict with an Add-in. Disable Add-ins in Word.
Use Task Manager to check for instances of winword.exe – when Read&Write is running there should be two. Close Word and Read&Write and then check in Task Manager and terminate any other instances. Restart Read&Write and Word and see if the issue is solved.
Try deleting Word add-ins (WLLs), Startup templates and COM Add-ins. Reset user options in Word.