Overview
These instructions are for deploying Read&Write for Google Chrome with a customized toolbar with features that can be turned off across a G Suite for Education domain, OU or a Windows network that can be used for restricting features for tests and exams
Please note: Once deployed any features that have been turned offr will be applied to all users on your domain
Steps
Create/Edit Settings Profiles
Export Profile to be used as template of features, add in desired blocked features list
File can be deployed through the Google Admin Console or by Windows Group Policy
Create/Edit Profiles
In your Read&Write for Google Chrome settings (Click the three dots on the toolbar, then "settings")
You can click the "Profiles" option on the top left to create and swap between Settings Profiles.For the purpose of exporting settings, you can edit your default or create a new profile. While that profile is selected browse through all the setting's tabs and set the preferred default settings. Note: editing the "Features" tab in your settings will only toggle off the feature by default, but can be turned on by the user. Follow the below steps to block features with an extra bit of text in your exported json file.
Export Profile to be used
In your Read&Write for Google Chrome settings, click on the "profiles" option at the top left. Select a profile you have edited to act as your template for user default settings.
Then scroll down and click the "export profile" button shown below
This will download 3 files:
A Json file which can be used to deploy via the Google Admin console.
A Chrome reg file which can be used to deploy via Group Policy for Chrome for Windows users.
An Edge reg file which can be used to deploy via Group Policy for Edge for Windows users.
Edit the exported Json or Reg file to include your list of blocked features.
You can refer to this list of possible feature names, and the example format to insert into the exported file:
| Audio Maker |
| Check It |
| Dictionary |
| Highlights |
| Hover Speech |
| Pause |
Picture Dictionary |
| Play |
Practice Reading Aloud |
| Prediction |
| Screen Masking |
Screenshot Reader |
| Simplify Page |
| Rewordify |
| Stop |
| Talk&Type |
| Translator |
| Vocabulary List |
| Voice Note |
| Web Search |
| Predict Ahead |
Example format of features section- This list would block the Audio Maker, Prediction and Translator features and should be inserted below the "settings" list, but before the final "}" in your exported file:
,"features": {
"Value": {
"Audio Maker": false,
"Prediction": false,
"Translator": false
}
}
Setting Up in the Google Admin Console
Login to the Google Admin Console with your G Suite for Education domain administrator account.
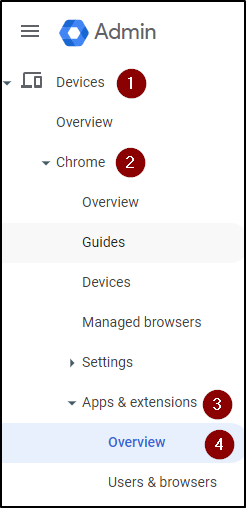
Select Devices > Chrome > Apps & extensions > Overview

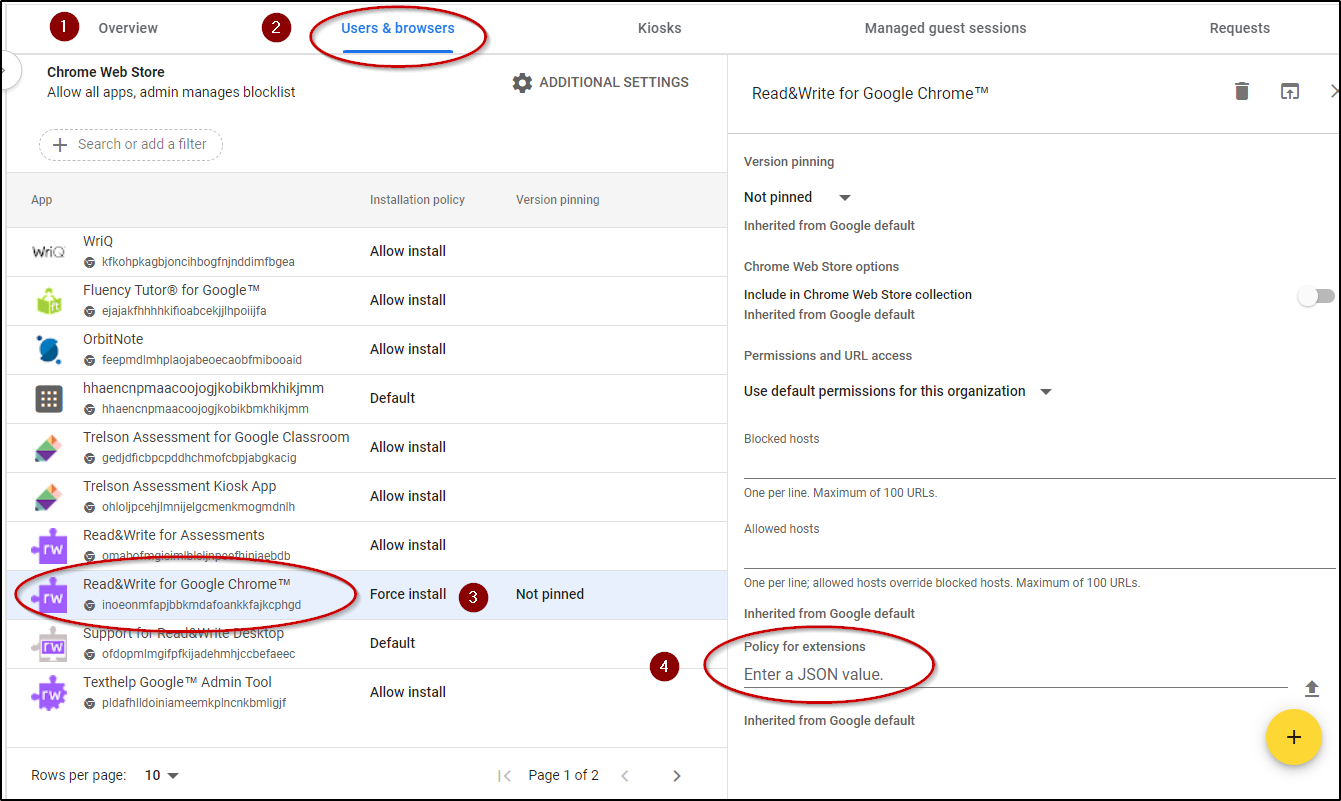
Once in Overview click Users & Browsers locate and select Read&Write for Google Chrome™.

Copy the text from the thrwpreferences.json file and paste it into the line Enter a JSON value
Click the X in the upper right corner and that will save the configuration.
It is recommended to remove any previous deployments to ensure that all users receive the updated default settings.
Deploying File via Group Policy
Update the Windows Registry on the target computers to allow Read&Write for Google Chrome to be setup with the custom configuration.
This can be done by running the thrwpreferences.reg file on Windows machines running Read&Write for Google Chrome.
If you have many machines, then we recommend deploying the Registry changes via Microsoft Group Policy. This can be done by deploying the .reg file as a machine login script or by applying the contents of the .reg file as a Group Policy Registry Item.
To reconfigure the toolbar, reset the thrwpreferences.reg file so that all features to be enabled show as =dword:1 and redeploy as above