Overview
These instructions are for deploying Equatio with a customized toolbar with features that can be disabled across a Google for Workplace domain, OU or a Windows network that can be used for restricting features for tests and exams
Please note: Once deployed any disabled features will be applied to all users on your domain
Steps
The Policy Files will need to be downloaded. Click here for the equatio_preferences.json file and here for the equatio_preferences.reg file
- Copy the contents of the equatio_preferences.json file in Notepad or TextEdit (or any basic text editor)
- To disable any features, change true to false and then save the equatio_preferences.json file
File to be deployed through the Google Admin Console
or
File to be deployed by Windows Group Policy
Files Download
Click here for the equatio_preferences.json file and here for the equatio_preferences.reg file to download the the files that are used to deploy Equatio with features that you choose to be disabled.
Follow the instructions for either deploying through the Google Admin Console or by Windows Group Policy
Deploying File through the Google Admin Console
Editing the Preferences File
To setup Equatio with features disabled, the following instructions can be used to deploy a custom toolbar:
Go to the location where the Policy Files were downloaded
Copy the contents of the equatio_preferences.json file in Notepad or TextEdit (or any basic text editor)
To disable any features, change true to false and then save the equatio_preferences.json file

For example to disable all features excluding the Screenshot Reader change the value in the editor from true to false.

Save the file when finished editing the features to be disabled
Setting Up in the Google Admin Console
Login to the Google Admin Console with your Google for Workplace domain administrator account.
Select "Select Devices > Chrome > Apps & extensions > Users & browsers".
Locate and select Equatio.

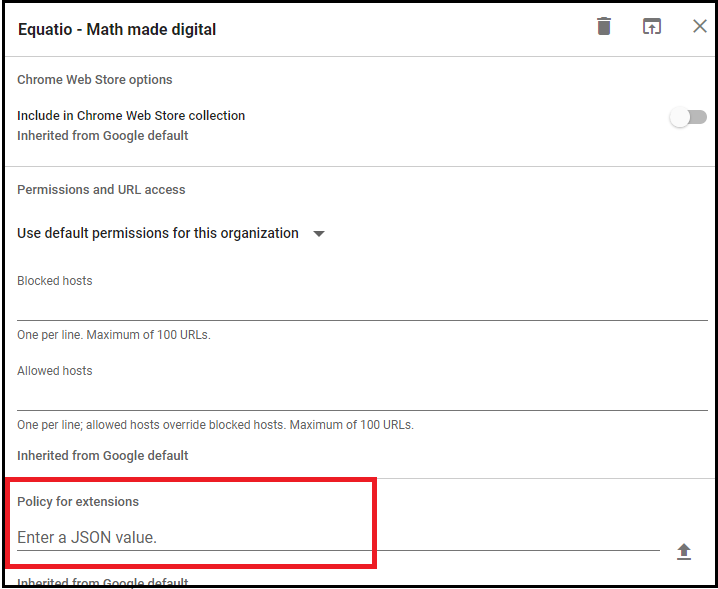
When you select Equatio, the following window will open

Copy the text from the equatio_preferences.json file and paste it into the line Enter a JSON value
Click the X in the upper right corner and that will save the configuration.
Deploying File via Group Policy
Click here for the equatio_preferences.reg file.
Right click on the equatio_preferences.reg file and choose Download to save it to a location of your preference
Editing the Registry Preferences File
Navigate to the location where the Policy Files were downloaded and select the equatio_preferences.reg file.
Right click on the equatio_preferences.reg file and choose Open with and open with Notepad (or any text editor)

To disable features, change the value of any feature from 1 to 0. For example, to disable Handwriting, Graph and Mathspace, change the value in the editor from 1 to 0

- Save the file when finished
Update the Windows Registry on the target computers to allow Equatio Google Chrome to be setup with the custom configuration.
This can be done by running the equatio_preferences.reg file on Windows machines running Equatio for Google Chrome.
If you have many machines, then we recommend deploying the Registry changes via Microsoft Group Policy. This can be done by deploying the .reg file as a machine login script or by applying the contents of the .reg file as a Group Policy Registry Item.
To reconfigure the toolbar, reset the equatio_preferences.reg file so that all features to be enabled show as =dword:1 and redeploy as above